Labor day already!!!! The summer just flew by, not that we had much of a summer here in Buffalo. I think there was a total of maybe 2 weeks of nice weather. Hard to believe I will have 2 of my 3 girls in school next week too! Well, I have a very crazy weekend ahead. No picnics for us, just a wedding, and all the things that go with it. Saturday is the rehearsal, and Sunday is the wedding, which means the girls will be up late both nights, and TOTALLY exhausted I am sure. I wanted to try to get a couple of projects made before the craziness begins though. I have 2 projects to show you tonight. The first is for the
Sweet Stop Challenge Blog (which will be a new sketch tomorrow, but I was happy to get at least done before the new one is posted), and the other is for the
Creative Belli Blog.
I used the owl from Owl Celebrations from Sweet and Sassy Stamps. I just love this owl!!! I stamped her once on white CS, and again on PP from Basic Grey Archaic paper. I then paper pieced the belly onto the colored image. I added some yellow stickles to the eyes. I then layered it onto some brown, from the same paper collection, and cream rectangles. The ribbon is from The Angel Company Willouby (spelling isn't correct here...sorry) Ribbon Set. The polka dot paper is also from the Archaic set. I used a rolling letter word stamp to create the sentiment.
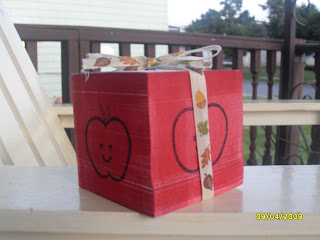
My next project tonight is for the Creative Belli Blog CBC73. The challenge this time is to create something with an apple or pencils theme...basically back to school. Here is what I came up with.
 I thought this would be a cute little back to school gift for a teacher. I used the blank memo cubes from Oriental trading. I then used my brayer and some red ink to cover each side. Little side note...the one side of the cube had the seal/glue stuff that holds that pad together, well the ink doesn't stay well on that...trust me! =) I have red fingers right now...haha. Anyway, after brayering the sides I used the Teacher's Pet "A is for Apple" stamp from Imaginisce on 3 of the 4 sides (didn't do the side that got my fingers all red). I used a black stamping spot for the apple, and a green one for the stem part of the stamp. That was pretty much it! I did use some cute fall ribbon to tie it all together to give as a gift.
Well that is pretty much it for today. Thanks so much for stopping by. Hopefully I will be able to get some great pictures of my little girls as flower girls this weekend, and post them soon. They are so excited to get all dolled up!
Jessica

 I layered him onto some brown patterned paper. All the background/printed papers I used on this card are from the BasicGrey Archaic Collection. I layered the dino onto the dinosaur PP, then layered that onto the stone looking PP. Before adding the brown to the green base, I used a dinosaur boarder punch along the top. When all was together, I added some eyelets along the dino PP.
  I went with the cowboy theme for 2 reasons. First, I needed a "boy" themed card for a birthday party next weekend, and second because I just got this TAC set and really really wanted to use it. The stamp set is called wild west (t-2633), and is available from the Angel Company current catalog. I just thought this little guy was adorable. I stamped him on tanish kraft CS, and colored him using watercolor crayons. I did add a little twinkling H2O yellow to the star...since every cowboy needs a gold star. I layered the image onto red CS. Then I made the background paper using some of the other stamps from the set. The black background paper is the co-ordinations blackmagic CS. I ran it through the cuttlebug, and sanded it for the red to show through. Here is a close up of that.

 I stamped the acorn image from a new TAC set. The set is called give thanks, and can be found in the new AVENUE magaloge. The set also includes some adorable Thanksgiving themed stamps, which I hope to use around that time. I stamped the acorn using brown ink, then colored it in with watercolor crayons. I added some gold stickles to the "vines", and some crystal stickles to the leaves. I punched it out with a square punch, and layered it onto the scalloped square. The "scalloped" look along the bottom I did by punching out circles and layering them. I used some PP I purchased a LONGGGGG time ago from the Target dollar section. The felt leaves are also from the Target dollar sections...probably the same year I bought the paper. The ribbon I found in the $1 bin at my LCS.
 Well that is all for today. After typing this all, I realized maybe I should have titled this post something about scallops. I think I used that word about 1000 times...lol. Thanks so much for stopping by!
 I used the hedgehog image from the TAC set Hedgehog Halloween, which is a new set just released at the beginning of September. It can be found in the magaloge Avenue. The set is just adorable. I am hoping to be able to show you a few more of the little hedgehogs in upcoming posts. I only had time to make one card before feeding the family dinner. I stamped the image on Kraft CS, and colored it with water based markers. I added a googly eye to him, and some brown fun flock (also available from TAC) to the back part of him. I layered the hedgehog image onto olive CS after distressing the edges of both CSs. The sentiment is also from the same stamp set. I colored the "Halloween" word in with orange marker. I layered that onto the olive CS and distressed the edges of that as well. The background printed paper is something I had "laying around" (which is part of the fun of the Creative belli blog...to use up or just use stuff we have laying around.). I believe I purchased it last year from the Target dollar spot. I added the ribbon which I also just had on hand. Here is a close up of the distressing, and you can also see the flock a little better.
 I used the color green, which I had the mono color CS set from TAC. The stamped images are from the SU set Thoughts and Prayers. The sentiment is from another SU set that I can't remember the exact name off hand, and didn't bring it up from the stamp room with me. I stamped the images, layered them onto the base. Added some green ribbon, and green brads. Very simple! Thanks for stopping by.
 I used the cuttlebug embossing folder to create the background. I used the black magic Coordinations CS. This paper is really cool...it is black, but when you emboss, sand, etc, it brings out the color underneath. I embossed and then sanded the CS to show the colors threw. The first section is yellow, then orange, and then another small strip of yellow. I added some yellow ribbon. The used the SU set for the images. I used markers to color the stamp, and then stamped the image onto cream CS. I used the scalloped square punch to punch them out. The sentiment is from a SU rub-on set.


 Thanks for stopping by.
  I used the SU set Cheep Talk for the branch, the birdy, and the sentiment. The red polka dot background paper is from Papertrey Ink. I stamped the branch, then put the little birdy on it. I added some candy cane red stickles and white liquid pearl to the birdy. Then I layer the white CS onto red CS. The blue CS strips were actual some scraps from my Christmas cards I have been cutting. The ribbon was just some ribbon I had in the ribbon drawer. All was layered onto a white CS base.

 Like I mentioned I was going to make a card, but wanted some kind of crazy folds. Some how when I got all the base scored, I realized I had the base of a box. So I went with it! The base is cream CS. I then scored a slightly larger piece of red CS. The apple background paper is from a set I purchase in the Target dollar spot last year. The little pie is from a digi stamp from Sweet and Sassy. It had a cherry on the top of it, but I cut that off when I trimmed it, and attached an apple from the BG paper instead. I layered the trimmed pie onto cream CS, then red CS. I used my CM oval cutters to cut the ovals from cream and red CS. I added some little buttons in red and green, and stickles to the pie image. The words, I used a rolling alphabet stamp to create. I thought the little box would be cute for a little mini pie, or some other little sweet fall gift!