Friday, December 16, 2011

SNSSDC - Tags

Hi there. Today we have a new challenge for you at the Sweet 'n Sassy Digi Challenge. This time, we challenge you to create a TAG using a digi image (of course!). Well the timing of this one worked out perfect for me. Last weekend we made teacher gifts, and I just need to add a tag to them. So...I did some "mass producing" using the adorable Cocoa's Stocking Digi.
Wow that picture makes it look like I made ton of them...lol. There are really only 11. I colored the digi images with watercolor crayons. There are 3 different "styles". I trimmed them down, and layered onto a piece of PP from Echo Park. I added some ribbon (which by the way I ironed...lol), and hand wrote the To: and From:. This weekend I will have my DDs fill in the names.
Now head on over to the SNSSDC Blog and see the rest of the tags the DT gals created. Then play along!

Friday, December 9, 2011

Tea Time

Hi there. Today we have a new challenge for you at the Sweet 'n Sassy Digi Challenge Blog. Our challenge this time around is "Tea for Two". We challenge you to use a digi image to create a tea themed project. Here is mine. I started with the adorable Cocoa mouse and his tea cup. I colored with watercolor crayons, and trimmed him down. Then I began my layering. The papers I used are all from one of the Sweet 'n Sassy Stamps kits of the month. These kits are great...not only do you get a stamp set, ribbons, papers, and embellishments, but also IDEAS!!!! The LO of my card is also one of the LOs from the July 2011 KOTM. They really are a great deal, and a great way to get ideas.

Now head on over to the SNSSDC Blog, and see what the rest of the DT gals have created for your inspiration, then play along!

Wednesday, December 7, 2011

Creative Belli - Winter/Christmas

Hi there. Soooo sorry for my lack of posts, and my late post today. I have had a lot going on, as most of us do this time of year. Plus to add to it, I have been subbing at my DDs' school this week. Sooo...nothing is getting done...lol. And like most of us, I have a lot going on in my personal life right now. Well, today is Wednesday, so we have a new challenge for you at the Creative Belli Challenge. Our challenge this time around is winter or Christmas. Here is what I came up with. I started by stamping this beautiful Pointsetta Flower stamp from Biblical Impressions. This stamp is actually the featured stamp this month for Biblical Impressions Stamps. Check out the details HERE on what you can do with this stamp. For mine, I stamped it and colored with watercolor crayons. I did some paper piecing on the leaves. I layered onto some PP from my stash (my "old" embellishment for the Belli Challenge), and layered that onto the red background PP. I used a rub-on for my sentiment, and added some little red gems to the corners. Last, I added some stickles to the center.

Head on over to the Creative Belli Challenge and see what the rest of the DT ladies have created. Then play along and link up your project for us to see!

Friday, December 2, 2011

SNSSDC - Gifts

Hi there. Today we have a new challenge for you at the Sweet 'n Sassy Digi challenge. Our challenge this time is to create a gift for someone using a digi image on it. I started with this adorable little Rhubarb Stocking digi from SNSS. I printed him out and colored with colored pencils. I added some smootch to the "white" parts of the stocking. Then I fussy cut him down. Next, I layered him onto the PP that I used to make this......ornament gift! My in-laws needed an ornament with a photo of my youngest DD, so I thought this would be perfect! I started with an acrylic "coaster" from Maya Road. I cut the PP from Nikki Sivils to fit. I wanted the photo to stay protected over the years, so I put the acrylic piece over the paper. The 2011 is stickers. Last, I added some ribbon to be the "hook". Oh yeah...and when I showed my DD the ornament of her, she felt the need to do this... ...and I LOVE IT!!!!! She wanted grandma and grandpa to know it was from her...lol. Now...head on over to the Sweet 'n Sassy Digi Blog and see what other gifts the DT gals have created. Then play along with us! Can't wait to see what you come up with!

Tuesday, November 29, 2011

Mom's Kitchen Rules

Hi there. I have been wanting to make this project all month, but haven't been able to get the supplies...well today I finally got them all! Earlier this week I bought the wooden plaque, and today I found the paper and the little embellishments at my LSS. All this to use with the awesome Moms Kitchen stamp from Biblical Impressions. Isn't it cute! I know I have seen this saying or something similar before, but I just loved it when I saw the stamp in the Biblical Impressions store. I started by using some white paint along the edges of the wooden plaque. Then I used Modge Podge to put the kitchen themed paper onto the plaque. I stamped the image onto white CS, and cute with my CM cutting system. While I was looking around my LSS today, the girl working pointed out the little kitchen embellishments. Funny, they were the same company as the paper! So I said...yeah, that will go perfect! They already had sticky stuff on the backs of them, so they were super easy to add onto the plaque. I really think they added so much to it too. Well that is all for now! I finally feel like my mojo is slowly coming back. This was actually my 2nd project I made today! The other one I will be sharing with you on Friday. Thanks for stopping by!

Monday, November 28, 2011

Legend of the Butterfly

Wow...what a weekend...that is all I got to say about that. Somehow I was able to get some crafting in, and created this cute little ornament using a couple stamps from Eureka Stamps. I just loved THIS butterfly stamp, but when I ordered it I didn't realize it was so large. Now if I had just read the size i would have been okay, but...yeah...I didn't...lol. This same image comes in two sizes though if you don't want one so large...lol. So...I decided to pull out the old Shrink paper. I stamped the butterfly, and cut it out. I remembered to punch the hole for the ribbon before "baking" Here is the before...Oh, yeah...I also colored with colored pencils before baking. A little tip...if you are going to use shrink paper, it is a good idea to sand it a little before stamping and coloring. Next, I baked it...and come out with this...As you can see it is much smaller now...lol. I added some ribbon to it so it can be used as an ornament or bookmark. Next, I attached it to the Legend of the Butterfly poem stamp. Here is a closer shot so you can see the poem a little more.

I just thought this was such a pretty poem, and would make a cute gift for someone special.


Well that is all ...thanks for stopping by!

Friday, November 25, 2011

SNSSDC - Our Favorite Things

Hi there. I hope you all had a wonderful Thanksgiving. We started our day yesterday with a race. Here in Buffalo, the YMCA does an 8K race every year on Thanksgiving morning called the Turkey Trot. This was the 116th year! Well, my husband and oldest daughter ran it for the first time yesterday. If you are a regular reader here, you know my DD is a 5K runner...and she LOVES IT! Well, they finished...and I couldn't have been more proud of my baby. She was completely exhausted after running 5 miles, but had an awesome time. What a great way to start the day.

Well we have a new challenge for you today at the Sweet 'n Sassy Digi Challenge. Our challenge this time is "Our Favorite Things". Basically, we want you to use your favorite crafting things on your projects using a digi image. Here is what I came up with. My first "favorite" thing on here is my Cocoa digi. I just LOVE LOVE Cocoa mouse from Sweet 'n Sassy Stamps. Now I don't like mice in real life, but Cocoa is just superb! I used the Cocoa's Leaf digi, and colored with watercolor crayons. Next, I layered onto some PP from my stash. My next "favorite" thing was flowers. I love layered flowers, or just flowers in general...so I added some little felt flowers, and a brad to hold them together. (I like brads too as a favorite). Last I added the little sticker for the sentiment.

Now head on over to the Sweet 'n Sassy Digi Challenge Blog, and see what the rest of the DT ladies have shared with their favorites. Then play along with us!

Wednesday, November 23, 2011

Creative Belli - Thanksgiving

HI there. Can't believe tomorrow is Thanksgiving!!!! We will be getting up early here, as my husband and oldest DD will be running the local Turkey Trot. This is the first year they are doing it, and my DD is just super excited! Then it is off to a friend's house for a party, and home for turkey dinner. Well in honor of the Thanksgiving holiday, our theme this week at the Creative Belli Challenge is Thanksgiving...or anything related to Thanksgiving. Here is what I came up with. I decided (in the spirit of the Belli) to pull out a stamp I haven't used...well ever...lol. I just love Cocoa Mouse from Sweet 'n Sassy Stamps. I have most of the clear stamp sets, as well as most of the digi images of this adorable mouse. Well, I don't think I ever inked this guy up, so I did today. Since Thanksgiving is related to the "harvest", I felt this image was perfect. He is from the Autumn Lovin' Cocoa Clear set. I stamped him and colored with watercolor crayons. I layered onto some DP from CTMH (which is also been in my craftroom for about a year). I added some lace and stamped the sentiment.
Now, head on over to the Creative Belli Blog, and see what the rest of the Belli girls have come up with for your inspiration. Then play along by linking up your project for us to see. And don't forget there is still a DT call going on for the Belli challenge too!

Friday, November 18, 2011

SNSSDC - Birds

Hi there...happy Friday! Today we have a new challenge for you at the Sweet 'n Sassy Digi Challenge. Our challenge this time is to use a bird image. Here is what I came up with for this one. I used the Winter Love Owls digi for my image. The cool thing about this image, is you can also purchase it already colored HERE! I colored mine with colored pencils and layered onto some PP from Nikki Sivils. I thought the little owl paper was perfect! I used sentiment from the paper collection, and added some buttons.
Head on over to the Sweet 'n Sassy Digi Challenge Blog and see some more bird themed inspirations. Then play along, and link up your creation for us to see!

Thursday, November 17, 2011

QKR Stampede Blog hop - Snowpeople

Welcome to your first stop on the QKR Stampede Snowman theme blog hop! If you are arriving here from the QKR Stampede Blog, then you are on the right path. If not, then head back there for a complete hop order. Our theme this time around is snowmen. There are so many adorable snowmen images in the QKR Stampede store HERE. For my project, I used the Saying Hello snowman stamp.


As you can see I actually made 4 cards. I wanted to try something different...I guess a little personal challenge. So I challenged myself to be "minimal"...lol. I used 2 full pieces of red CS, and one long piece of gingham ribbon, and 1 image. The ribbon was enough to make all 4 cards! I stamped the images and added just a little color to each one. Then I layered them all a little different. For the sentiments, I used a couple of the stamps from the Deck the Halls set. Here are a couple close ups. Well that is all from me, so now I send you off to your next stop in the hop...


Thanks for hopping with us!

Tuesday, November 15, 2011

Turkey Boy

Today I wanted to share a quick Turkey card with you. For this card, I used the Turkey Boy image from Biblical Impressions. Isn't' he cute? I stamped him off, and colored with colored pencils and Gamsol. Then I fussy cut him out. I layered onto some PP from Echo Park. I added some brown ribbon and a bow. Very simple, but a cute card.

On a side note, for the month of December QKR Stampede, Eureka Stamps, and Biblical Impressions will be doing something a little different. We want to feature YOU! Head on over to each of the sites to get all the details about the Customer Blog Hop, as well as the DT Call that is going on right now.

Sunday, November 13, 2011

Eureka Stamps Blog Hop - Words

Hi there! I am so glad you are hopping along with us today. If you arrived here from Dawn's Blog, then you are on the right path...if not, please head back to the Eureka Stamps Blog for a complete hop order...you don't want to miss anyone! Our theme this time around is "Words". We are using Eureka Stamps Sentiment stamps as the focal point on our projects. Here is what I came up with.For my card, I used the I Can Do stamp which is the Bible verse Philippians 4:13. I stamped the image onto some PP from Bo Bunny. I really felt the paper was so pretty on it's own, it didn't need much else...but what fun would a card be without glitter????!!! So, I used some stickles on parts of the letters, and some smootch on some of the dragonflies and leaves on the PP.

Next I layered onto some grey CS, and then a white CS base. I added some little red brads to each corner too. Well that is all from me. Now off to your next stop on the way...


MONIKA


Thanks for hopping along with us!

Friday, November 11, 2011

SNSSDC - Paper Piecing

Happy Friday. I hope you are enjoying your day. Happy Veterans Day to all those in the USA. Today we have a brand new challenge for you at the Sweet 'n Sassy Digi Challenge Blog. Our challenge this time is Paper Piecing. Here is what I came up with.Now I took the paper piecing idea to a different level this time. Usually you stamp (or print in this case) the image twice and then layer the PP on top of the image. However this time around I decided to do some reverse paper piecing. I used my execto knife to cut out some parts of the Rhubarb's Sunflower Digi image from Sweet 'n Sassy Stamps. Then I layered the PP under the image. I used watercolor crayons to color in the rest of the image. I layered onto some PP, added some ribbon and buttons.
Now it is your turn to play along. First, head on over to the Sweet 'n Sassy Digi Challenge Blog, and see what the rest of the DT gals have created for your inspiration. Then grab a digi, paper piece, and link up your creation for us to see!

Thursday, November 10, 2011

Biblical Impression Blog Hop - Thanksgiving

Hi and welcome to the Biblical Impressions Blog Hop. If you arrived here from Christine's Blog, then you are on the right path. If you are just arriving here, then head back to the main Biblical Impressions Blog, and start from the top. Our theme this time is Thanksgiving/Gratitude. Here is the card I came up with for this hop.

I really wanted to showcase the Give Thanks Sentiment from the Biblical Impressions Store. I thought it was such a pretty font. So I decided to make a simple card to feature it. I went in search of some "Thanksgiving" themed PP the other night, and found this paper you see on the background. I loved all the different designs it had on it. The back of the paper was the pretty green, so I used a piece of that to stamp the sentiment onto. I layered onto a cream CS base, and added some mustard yellow ribbon. See...very simple, yet very elegant.

Well now I must send you off to your next stop along the hop...

Monika

Thanks for stopping by, and enjoy the hop!

Snowmen...

Hi there. Today I wanted to share a cute little snowman card with you. I know it is only November, but I am sure the snow will be here before we know it. Actually some parts of the USA have already had snow! Here in WNY, we only had a little bit that didn't stick...much to the disappointment of my children (they are skiers...lol). For my snowman card I used the Snowman stamp from QKR Stampede. Isn't that snowman so stinkin' cute????!!!! I just love this guy. I stamped him on cream CS, and trimmed him out. I added some color using watercolor crayons, and then used some buttons where the buttons on the image were. For the sentiment, I used the Cold Hands stamp from QKR Stampede. Last, I layered the images onto some PP from Echo Park, and added some snowflake eyelets. Well that is all for now. If you like this snowman, be sure to check out all the other snowman stamps from QKR Stampede. They are great for Christmas cards...especially if you are like me, and end up sending your holiday cards out late...lol...at least you got the winter part covered...lol.

Wednesday, November 9, 2011

Creative Belli - Paper Piercing!

Hi there, and happy Wednesday. Wow this week is just flying by! I am all thrown off this week because the kids have had one day off already, and have another day off on Friday. 3 day school week...not too bad for them...lol. Well, today we have a brand new challenge for you at the Creative Belli Blog. This time our challenge is Paper Piercing....notice the "r"....that means poking holes not piecing papers...lol. I always get the 2 confused. Well here is what I came up with. My nephew just turned 2, and we are going to his party this weekend, so I thought I would make a card for him. So...I decided (in the spirit of the Belli) to use a stamp I haven't used in FOREVER! I pulled out this adorable little guy from The Greeting Farm. I stamped him off and colored with markers. Next I layered him onto some mustard colored CS, and PIERCED some holes in that. Then I thought the "2" should be on there somewhere, so I pulled out another stamp set that honestly I haven't use at all since I won it as some blog candy. So...I inked up the "2" and colored in with markers. I layered that on mustard CS and paper PIERCED there as well. I then layered onto some dinosaur paper from my stash, and a white CS base. OH yeah...can't forget about the red twill ribbon.

I then gave the card to my girls to write on the inside for their cousin. Let me just say...that was ADORABLE! My 4 year old copied everything her sister wrote...just in a 4 year old's handwriting. SOOOOOO CUTE!!!!

Ok...now head on over to the Creative Belli Challenge and see what the rest of the DT gals have come up with. Then play along! Also...in case you missed it...we are having a DT call at the Creative Belli Challenge too...so be sure to check that out!

Monday, November 7, 2011

Hi there. Happy Monday! Did you remember to change your clocks on Saturday? I know not everywhere in teh world does it, but it is nice to think that I could have had an extra hour of sleep. However...I did not...lol. I was woken up at 3 by one child with a nightmare, and at 4:30 by another who was worried about the first one not being in bed....lol. Then for the next 3 hours I was asked multiple times when I was getting up. Oh fun! Well, I did manage to rest a little on Sunday afternoon, and relax a bit in my craftroom making this card using the one of the Tender Thoughts sets from Eureka Stamps. 
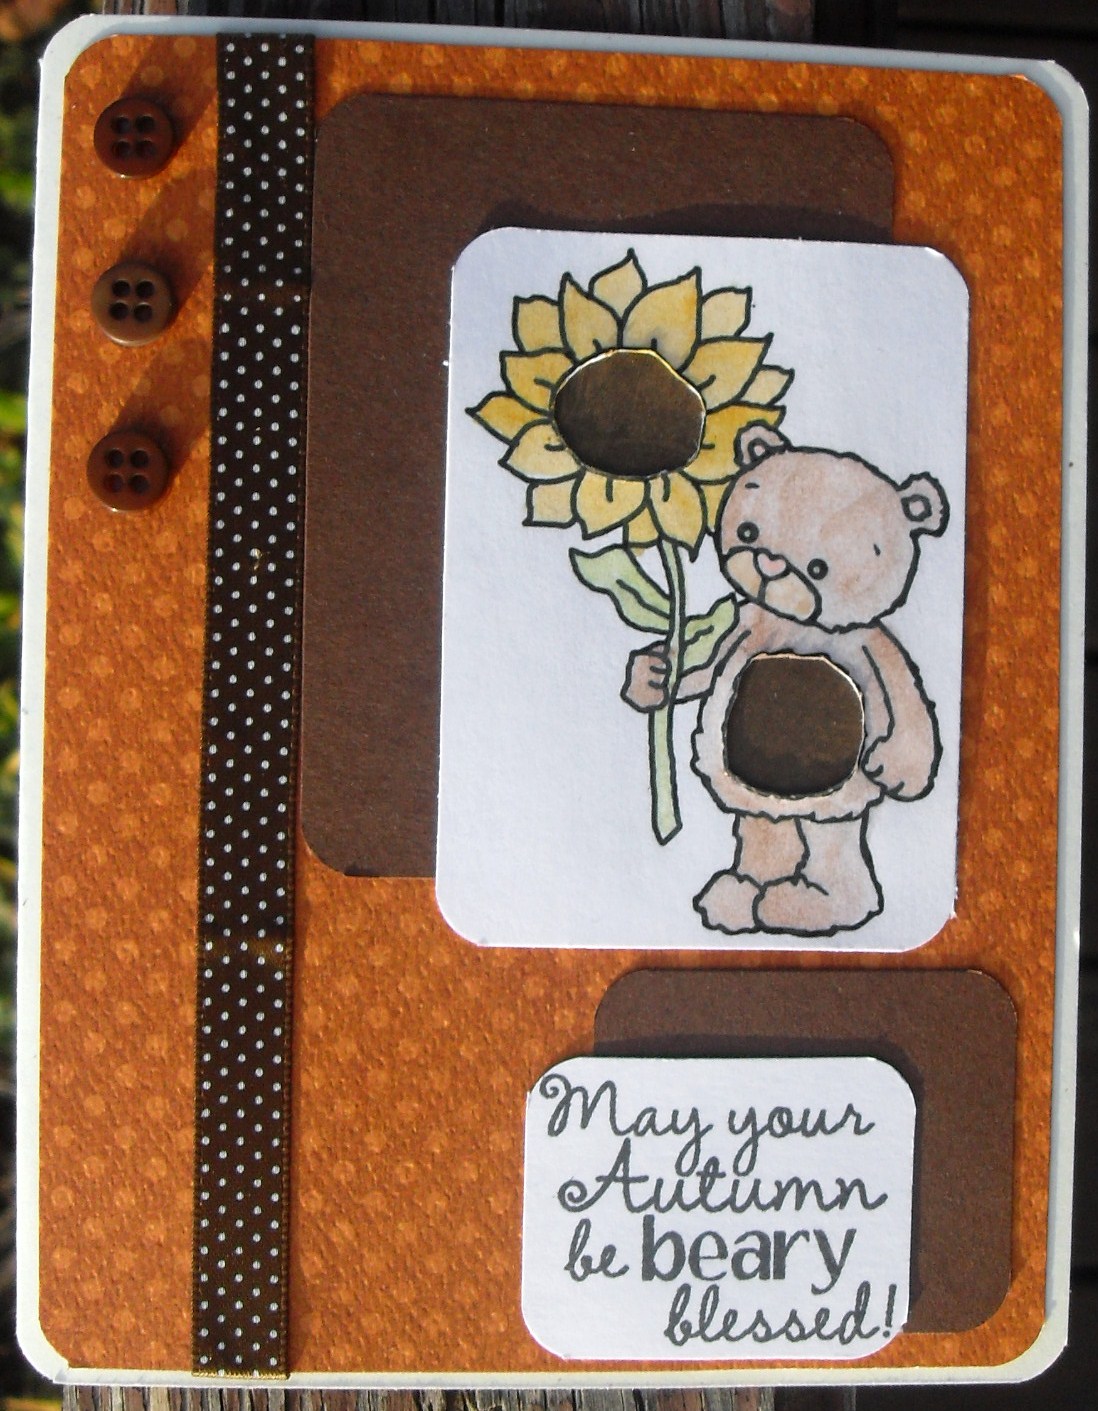
If you haven't checked these out before, you really need to. These stamps are great. There is one bigger stamp with a sentiment included on it, and then a smaller one that you can use to make the image "pop". As you can see, I did just that with this card. I started with the On My Heart stamp. I stamped it, colored it, and trimmed it down. Next I layered onto some green and orange CS. Then I stamped the Butterfly and Sunflower stamp. Trimmed it, colored it, and used pop dots to layer over the base stamped image.


Well that is all. Thanks for stopping by!

Sunday, November 6, 2011

My MIL's Birthday Gift

Hi there. Today my girls and I are going to visit my in-laws to celebrate my MIL's birthday. So...I wanted to share with you the gift I made for her. I saw this wooden frame this past summer at AC Moore, and knew I wanted to make something with it. So I thought this was the perfect time to do it. So I went back, bought the frame, and the PP to cover it. Here is how it turned out.

The frame is actually 12 x 12, so one whole piece of PP was needed to cover it. I used mod-podge to stick the paper down to the frame. Once it was totally dry, I used my xecto knife to cut the photo slots out, and trim the edges. Then I used my Cricut to cut the words. I was going to add some more, but I really liked the simplistic look of this. Simple and elegant. I think the paper was so pretty alone, that it didn't need much else. The last thing I did was add some purple stickles to the words to make them stick out more. Well...thanks for stopping by today. Have a great day!

Friday, November 4, 2011

SNSS Digi Challenge - Christmas

Hi there. Today we have a new challenge for you at the Sweet 'n Sassy Digi Challenge. Our challenge today is a Christmas or Holiday theme project using a digi image. Here is what I came up with.... I started with this great Away in a Manger Digi image from the Sweet 'n Sassy Stamps store. I love the way this image looks just the way it is, so I added very little color to it. Of course I wanted the Baby Jesus to stand out, so I added some color there, but otherwise, I pretty much left it. I trimmed it down, and layered onto the snowflake PP from Imaginisce. The rest of the layers are also Imaginisce. I added some ribbon, and a rub-on for my sentiment.
Now head on over to the SNSS Digi Challenge Blog, and see what the rest of the DT gals have created for your inspiration, then play along! Don't' for get to welcome our 2 new DT gals too!

Oh...and in case you missed it...Sweet 'n Sassy Stamps is celebrating it's 4th birthday!!!! In honor of the birthday, Korin is offering some AMAZING deals between now and the 7th of Nov., so head on over to the Sweet 'n Sassy Store and check out the deals...plus the new releases that were released last night!

Tuesday, November 1, 2011

Belli Challenge DT Call

Hi there....I thought I would share a fun DT Call with you. I have been a member of the Creative Belli Challenge for a while now, and just LOVE this team! Not only do you get to work with some awesome talent, but you are encouraged to use stuff in your craft cave you HAD to have, but never use. So...head on over to the Creative Belli Blog, and check out all the details on how you can be a part of the 2012 Belli Girls.

Happy November!

Wow...November 1st! Where did this year go????!!!! Ok...with Halloween over, it is time to get in the "holiday spirit". Before we know it, it will be Thanksgiving, and in less then 2 months we will all be celebrating CHRISTMAS!!!!!!! ARRRRRGGGGGGG! Ok...panic attack over...lol. Today I wanted to share a simple card I made using a beautiful fall stamp from Biblical Impressions. I used the Lg. Cornucopia stamp for my card. This image is also available in a smaller size if you don't like bigger stamps. I stamped it onto some cream CS, and colored with watercolor crayons. I layered onto some brown CS and then onto a cream CS base. For the sentiment I used a rub-on. Like I said...simple, but honestly I think the image alone is just so pretty that you don't really need anything else.


Well that is all for now...have a great day!

Monday, October 31, 2011

Happy Halloween!!!!!

Ok...I will be the first to admit...I HATE Halloween...lol. There is something about it that I just can't stand...however, as a mom of 3, I have no choice but to be a part of the holiday. So today involved me spending my entire morning at the school helping with parties, and watching parades. Then it was free kids meals at Applebees with my mom...and now I just sent my children off to Trick-or-Treat with their daddy. So...I thought I would share this Halloween card I made last night using the Pumpkin Kitty stamp from Eureka Stamps.
A very simple card...but cute. I stamped the image, and colored with markers. Then I layered onto some Orange and green CS, and some PP from my stash. Like...I said...very simple...lol. Now I will leave you with a shot of my Trick-or-Treaters!

HAPPY HALLOWEEN!!!!!!!!!

Friday, October 28, 2011

Sweet 'n Sassy Digi Challenge - Harvest Time

Today we have a new challenge for you at the Sweet 'n Sassy Digi Challenge. This time we challenge you to use a digi with a fruit or veggie in it....A Harvest theme. For my card I used the Cocoa's Pumpkin digi from the SNSS Store. I colored with colored pencils and Gamsol. Then I trimmed the image down. I used some pumpkin paper from Imaginisce, and some olive and orange CS from my stash. I used a white gel pen to make "faux ribbon" and write the sentiment.

Head on over to the Sweet 'n Sassy Digi Challenge blog and see what the rest of the DT gals have come up with. Then play along! Can't wait to see your Harvest themed creations!

Wednesday, October 26, 2011

Creative Belli - 1,2,3,4 Challenge

Hi there. Today we have a new challenge for you at the Creative Belli Challenge. Our challenge this time around is a 1,2,3,4 challenge. Gotta admit, I wasn't quite sure what that meant when I first saw it, but once it was clarified, it made total sense. So what is it you say...here is the example us DT gals were given...example: 1 piece of dp, 2 flowers, 3 colors, 4 brads, whatever combo you wish but it must be 1234.
So...here is my take on this one.

1 - Ribbon


2 - Images/Stamps


3 - Papers


4- little pearls


So...I used the Nurse stamp from QKR Stampede to start. I stamped her off and colored with markers. Next I trimmed her down a little, and layered onto the different PPs. The papers are from Nikki Sivils Get Well Collection. I added some ribbon from my stash, and the little pearls from my stash. Last I stamped the Get Well stamp from QKR Stampede, and trimmed that down. There you have it! Now it is your turn. Head on over to the Creative Belli Challenge Blog, and see what the other DT ladies did with this challenge. Then play along by linking up your 1,2,3,4 creation to the link at the bottom of the Belli Post!

Tuesday, October 25, 2011

Papa's Birthday Gift

Hi there. Today is my dad's birthday, so I wanted to make him something special. A couple years back, I went to a convention and volunteered, therefore getting all sorts of free stuff! So...one of the things I had picked up was a set of mini board books. Well, I have only used 1 of them in the past couple years. I decided to pull another one out for my dad's birthday gift. I started by using the Lg. Scribble Heart stamp from Biblical Impressions.

Something neat about this image is it comes in 3 different sizes, so if the one I showed here is too big for your needs, there are 2 smaller sizes. For this project, I stamped the heart using versamark, and embossed it with Sticky Powder. Next, I used some of the rub-on foils that are available from our sister company QKR Stampede. The first time I played with the rub-on foils was at the convention in August. They really are pretty neat to play with. While playing, one of the customers asked what would happen if you "re-heat" the foils after you put them on. Well for kicks, I tried it that day. One thing we did notice was it raises it up just a little bit. So I did that this time with this heart. I then took the finished heart and layered it onto the cover of the book. The words on the bottom are stickers. ALl the papers and stickers came with the books as a set. I did add something to the first page, but that was as far as I got...lol. I thought I would give it to my dad, and have him show me what photos he wants in there, and I will then add them.


Well that is all for now. Have a great day!

Monday, October 24, 2011

Christmas Notebook

Today I wanted to share an altered project I made using the Dog Pile stamp from Eureka Stamps. I had this notebook laying around in my craftroom just waiting to be altered, and I was inspired to finally do it! For starters...I had to do some painting. The area next to the wire binding was light blue, so I had to cover that up somehow. So I took some white paint and covered it. Next I used some Christmas PP from SEI to cover the front and back of the notebook. Then I stamped the Dog Pile stamp on white CS, and colored it with markers. I also added some stickles to the ornaments, star, and the candy cane. I fussy cut it down, and layered onto the front of the notebook. Last, I added some stickers from the paper collection to embellish it up a bit.

That is all for now! Have a great day!

Saturday, October 22, 2011

Altered M

Happy Saturday! I hope you are having a wonderful weekend. I love weekends...so nice to not have to drive the kids to school, but instead just be home and relaxed...minus the 10,000 birthday parties we have to drive them to each weekend...lol. Speaking of parties...my oldest DD is going to one tomorrow, and I thought it would be fun to making something as part of the gift. Awhile back, I made altered alphabet letters for my girls, so I thought I would make one for my DD's friend. Here is what I came up with. She said her friend likes purple, so I went to my LCS and picked up some purple PP. I used mod-podge to put the paper onto the letter (which was purchased at Hobby Lobby). Next, I used my Cricut to cut the name out. I made the shadow using white CS, and some PP for the name. I also used a white gel pen to trace over the letters. Next I used a bunch of flowers from Imaginisce to create the big flower on the left. I used a brad to hold them all together (it is a cord brad from Nikki Sivils). I used scor tape to attach that so it stays good.

Now I am loving the idea of making these as gifts for my nephews and niece for Christmas. What kid doesn't like to see their initial all fancied up! So I will be heading back to Hobby Lobby for more of these letters, and some papers to create more of these. Thanks for stopping by!

Friday, October 21, 2011

Shaped Card - Sweet 'n Sassy Digi Challenge

Hi there. Today we have a brand new challenge for you at the Sweet 'n Sassy Digi Challenge. This time our challenge is to use a digi image on a shaped card. That is right...no "normal" cards...we want shaped ones. Here is what I came up with. I have used this mug pattern before, and thought this Rhubarb Digi went just perfect with it! I colored this guy with markers and fussy cut him out. Then I layered him onto a brown CS circle. Next I used some little mug PP to cover the front of the mug. I wanted it to look like it was full of my favorite Coconut flavored Coffee, so I added some darker brown paper to the inside rim.

Well now head on over to the Sweet 'n Sassy Digi Challenge blog and see what the rest of the DT ladies have created. Then grab some digis and play along!

Thursday, October 20, 2011

QKR Stampede Blog Hop

Hi and welcome to the QKR Stampede Blog Hop. I am your first stop after the QKR Stampede Blog, so if you arrived from there, you are on the right path. If at any point you get "lost", just head back to the QKR Stampede Blog for a complete hop order. Our theme this time is Get Well / Encouragementt. We are featuring some of the great stamps in that category from the QKR Stampede Store. For my card, I made a get well card. I started by stamping off the Sick as a Dog stamp on white CS. Next I colored him in with colored pencils and Gamsol. I trimmed it down, and layered onto some PP from TAC. I added some golden/yellowish ribbon. Last, I stamped the Get Well sentiment in black ink on the bottom.


Well that is all from me...now head on over to see what


has come up with. Enjoy your time with us!

Get Well

Hi there. I first want to apologize for being some absent lately. I have been trying to work on stuff, but nothing is flowing in my mushy brain...lol. Well...today I thought I would share one of the things I came up with this week. Tomorrow, the QKR Stampede DT ladies will be having a blog hop, and our theme is Get Well/Encouragement. So I thought I would stick with that theme when I made this card. Yes that is a giant bandaid...lol. I used my Cricut to cut the card shape out. I believe it is from the Wild Card Cartridge. Then I used the Get Well stamp from QKR Stampede and a rainbow ink pad. I just randomly stamped the sentiment all over the card. In our house we don't have plain brown bandaids...so I thought the colors were more like what we have here...lol. With 3 little girls we have all sorts of character bandaids...ha ha.
Well be sure to stop back tomorrow for the QKR Stampede DT Blog Hop!

Monday, October 17, 2011

Christmas Kitties

HI there. Wow...my creativity seems to have left me months ago, and not coming back...lol. I have not been happy with anything coming out of my craftroom lately. BUT...I am trying...lol. Anyway today I wanted to share a card I made using the Cat-r-Pillar stamp from Eureka Stamps. So when I ordered this stamp, I kinda missed the part that says how big it is...lol. But that is okay...I just love it! Some of the other Eureka DT ladies have been sharing the Dog Pile Stamp, so I decided to share the kitty version of it with you. Both images are very tall, but absolutely adorable. I stamped this image, and then colored with watercolor crayons. Next I layered onto some green CS. The PP I found in my stash and thought went perfect with the lights on the stamp. For the base I used some red CS. On the inside I stamped the Piled High Christmas sentiment. It goes perfect with this stamp and the dog stamp. If you like the piled animals, there is also a piled Bunny Stamp. The bunnies are more spring themed, but just as cute! Thanks for stopping by!

Thursday, October 13, 2011

Biblical Impressions Blog Hop

Hi there, and welcome to the Biblical Impressions Blog Hop. If you are arriving here from the Main Blog, then you are on the right path! Our theme this time around is Friendship/Encouragement. Boy did I need this theme right now in my life! I actually had a dear friend in mind when I made this card. Here is what I came up with. I started by stamping the Sentiment stamp called I am Blessed with black ink on grey CS. Next, I layered that onto some darker grey. For my base, I used some PP I got from a QKR Stampede card kit. These card kits are available at the show booths when QKR Stampede does a convention/show. All the papers on this card are from one of those kits. Next I layered the flowers...which are also from our sister company QKR Stampede. Finally I added the little iRock gems along the circle. Very simple, but really says what needs to be said to someone you really care about.


Now off you go to your next stop on this hop...


Thanks for hopping by!

Wednesday, October 12, 2011

Creative Belli - Glitter, Felt, or Flower Soft

Hi there. Today we have a new challenge for you at the Creative Belli Challenge. This time we are challenging you to use big glitter, felt, OR Flower Soft. So I decided to use flower soft. I haven't pulled it out in awhile, so I thought this was a great time to pull it out. I started by stamping the Rose stamp from QKR Stampede. I colored it in with marker, and added pink flower soft to the petals. Next I did some layering using some Echo Park Papers. And as you can see...I went a little crazy with the ink distressing and stippling...lol. I wanted to add some ribbon, but I felt the ribbon was too bright for the card...so I rubbed it along the black ink pad.
Now head on over to the Creative Belli Challenge and see what the other ladies have come up with. Then play along..what a great way to use some of those supplies you haven't touched in awhile!

Sunday, October 9, 2011

Eureka Stamps Cats and Dogs Blog Hop

Hi there! If you arrived here from Dawn's Blog, then you are on the right path. If not, please head back to the Main Eureka Blog and start the hop from the beginning. Our theme this hop is Cats and Dogs. We are featuring some of the adorable cat and dog images from Eureka Stamps. Here is what I came up with using the Party Poopers stamps. I stamped this image off and colored with watercolor crayons. Next I layered onto the party themed paper I found in my stash. I used some stickers to embellish. The nice thing about this image is it's size. With such a large image, there isn't a lot of "extras" needed for the card, but it makes a great birthday card! My DD will be using this one for a party she is attending on Friday.


Well I must sent you off to your next stop, which is ....


Enjoy, and thanks for hopping by!

Friday, October 7, 2011

SNSSDC - Baby

Today we have a brand new challenge for you at the Sweet 'n Sassy Digi Challenge. This time around we are challenging you to create a baby themed card. Remember we are a digi challenge, so only digi images are allowed to play along. So I strayed from the norm for this one and made a baby boy card. As a mom of 3 girls, I am not familiar with the color blue...lol. I started with the adorable Cocoa's Train Digi from the SNSS store. I colored him in with colored pencils. Then I trimmed it down, rounded the corners and layered onto blue CS. The little hands and feet PP I had in my stash from a project I made for my nephew last year. I used a sticker for my sentiment, and added some blue gems.

Now head on over to the Sweet 'n Sassy digi challenge blog and see what the rest of the DT girls have come up with. Then grab a baby themed digi and play along!

Thursday, October 6, 2011

Paper Pieced Rose

Today I wanted to share a card I made using the ROSE stamp from QKR Stampede. I thought the Echo Park Victorian Garden Collection went perfect with this image too. I stamped the image on white CS, and then again on some of the PP. Then I paper pieced the flower and most of the leaves. I used a marker to fill in the rest of the image. Then I used a stipple brush and some green ink to ink distress the entire card. I really wanted to bring that green out. Last I added the ribbon, and the Happy Anniversary stamp.

Well that is all. Have a great day!

Tuesday, October 4, 2011

Be Still...

Today I wanted to share a quick easy card I made using 2 of my new stamps from Biblical Impressions. My new DT stamps came yesterday...I just love when I get new stamps! Here is what I came up with. I told you it was simple...lol. Sometimes simple is good though. I started by stamping the Babys Breath stamp with versamark and embossing with white embossing powder on purple CS. Next I layered that oval onto a green oval. Next I pulled out some green and purple PP from Cosmo Cricket and did some layering. Last I stamped the Be Still stamp with versamark and embossed with white.

I really like this card for a "thinking or you" or "encouragement" card.

Well I am off...have a great day!

Monday, October 3, 2011

Halloween Kitty

Hi there. I can't believe it is October already!!!! That means here in my house the discussion is all...Halloween costumes. Well...I have officially purchased 2 of the 3 costumes I need. I will be making the 3rd one. And yes...2 of my 3 girls are going to be Angry Birds....LOL. Well...in honor of the upcoming fun day, I thought I would share this cute simple Halloween card I made using the adorable Pumpkin Kitty stamp from Eureka Stamps. Like I said...very simple! I wanted to add a sentiment, but I thought this card would also word as a general fall card, so I didn't put the "Halloween" sentiment on. The image was stamped on white CS, and again on orange. Then I cut the orange pumpkin out and layered onto the first image with foam tape. Then I simply layered onto the pumpkin background paper. Last, I added some orange ribbon.


Well that is all from me for today. Have a fabulous Monday!