Showing posts with label random nothingness. Show all posts

Sunday, November 6, 2011

My MIL's Birthday Gift

Hi there. Today my girls and I are going to visit my in-laws to celebrate my MIL's birthday. So...I wanted to share with you the gift I made for her. I saw this wooden frame this past summer at AC Moore, and knew I wanted to make something with it. So I thought this was the perfect time to do it. So I went back, bought the frame, and the PP to cover it. Here is how it turned out.

The frame is actually 12 x 12, so one whole piece of PP was needed to cover it. I used mod-podge to stick the paper down to the frame. Once it was totally dry, I used my xecto knife to cut the photo slots out, and trim the edges. Then I used my Cricut to cut the words. I was going to add some more, but I really liked the simplistic look of this. Simple and elegant. I think the paper was so pretty alone, that it didn't need much else. The last thing I did was add some purple stickles to the words to make them stick out more. Well...thanks for stopping by today. Have a great day!

Saturday, October 22, 2011

Altered M

Happy Saturday! I hope you are having a wonderful weekend. I love weekends...so nice to not have to drive the kids to school, but instead just be home and relaxed...minus the 10,000 birthday parties we have to drive them to each weekend...lol. Speaking of parties...my oldest DD is going to one tomorrow, and I thought it would be fun to making something as part of the gift. Awhile back, I made altered alphabet letters for my girls, so I thought I would make one for my DD's friend. Here is what I came up with. She said her friend likes purple, so I went to my LCS and picked up some purple PP. I used mod-podge to put the paper onto the letter (which was purchased at Hobby Lobby). Next, I used my Cricut to cut the name out. I made the shadow using white CS, and some PP for the name. I also used a white gel pen to trace over the letters. Next I used a bunch of flowers from Imaginisce to create the big flower on the left. I used a brad to hold them all together (it is a cord brad from Nikki Sivils). I used scor tape to attach that so it stays good.

Now I am loving the idea of making these as gifts for my nephews and niece for Christmas. What kid doesn't like to see their initial all fancied up! So I will be heading back to Hobby Lobby for more of these letters, and some papers to create more of these. Thanks for stopping by!

Saturday, September 3, 2011

A little Saturday Fun

Hi there. Today it has been very hot here, so I have been spending some time in my nice cool craftroom. Well, I decided to play along with a contest on Facebook. The challenge was to create a 1 page LO. Here is what I came up with. My middle DD got to ride on the roller coaster at one of our favorite amusement parks for the first time this year. So I created this page to document that ride for her. My papers are from SEI. I couldn't' find just a roller coaster, so I cut the one on the top of one of the SEI papers off and put it along the bottom. I layered all the photos onto mint green mattes to go with the green in the BG paper. I used my Cricut to cut the title.

Have a great weekend...and a Happy Labor Day to all my readers in the USA!

Saturday, August 20, 2011

PEEPS!!!!

So I have been starting to go through my papers and get things in order for my scrapbooking weekend trip in Sept. Yes I know it is a month away, but I am just sooo excited, that I have to get started now. I went through and made a list of some of the papers I would like for my album, and then headed off to my LSS. There I picked up a whole bunch of fun stuff! When I was putting it away, I found my paper I bought to scrap the pictures of my youngest helping me make chocolate dipped Peeps at Easter time. I also picked up the stickers to match. Check this out... AHHHHHH PEEPS PAPER!!!!!! LOVE IT! This is made by Creative Imaginations, and they actually have a whole line of Peeps stuff. I will admit...I do enjoy my Peeps, but only when they are "stale"...lol. That is right...I buy them and either poke holes in the package, or open the package totally. Then the process begins. They must sit for a couple days in order to be just right for me...I don't like the Peeps fresh...they need to have a little crisp to them. Gross, I know, but hey we all have a quirks. Anyway...I layered my photos on the paper, and added some of the pink glittery Peeps bunny stickers. I used my Cricut to cut out the word PEEPS (in yellow because that is the color of the Peeps my DD is dipping in the pictures). Then I added some stickles to the letters, so they matched the sparkly stickers. A very simple page, but I just love it. Now I am craving Peeps...and yes I actually have some in the house! WHY???? Well about a month ago, my mom was in Washington DC, and guess what they have there????? A PEEPS STORE!!!!!!!!!!!! You know where I am going next time I am down there.

Have a great weekend!

Saturday, July 30, 2011

Wedding Gift - Lots of photos

Hi there. Today we are going to a wedding for my DH's uncle. I thought it would be fun to make an album for them as a gift. So I purchased a wedding album kit at a LCS...actually I got it on sale...because it was open and missing over 1/2 the stuff from the kit. Then I purchased another wedding album kit. Got home, and started working on it, only to realize the kit I purchased was for an 8" x 8" album, and I have a 12" x 12" album to work with....ugggggg! So back to the store to try again. This time I picked up a 12 x 12 pack of PP, and 2 sets of solid color 12x12 papers. The one set was even metallic papers. Then I got to work. I used various ribbons, stickers (which I bought for the album, and ones from my stash), ribbon slides, brads, flowers, etc...you get the idea...lots of embellishments. I just love the way it turned out, and I hope the happy couple does too. I am going to offer to put the photos in for them later if they want me to. I did label each "matt" as to what size photo is supposed to go there. So here is the pages I made...minus 1 (I didn't get a shot of the very first page of the album). I did not included company names for papers, but if you want to know, just leave me a comment, and I will get back to you. Thanks!
Well that is it! What did you think? Off to celebrate, and "Dance the night away!" Thanks for stopping by!

Saturday, July 16, 2011

Shower Card

I totally forgot to make a card for the shower I am going to today...lol. So last night, I ran down to my craft room and "whipped" one up. Thankfully my table is once again covered in wedding album making supplies, so I was able to find something that would work. Sorry the photo isn't the greatest...the sun was already set by the time I get this done, and I have to get it ready to go for the shower. We have about an hour and 1/2 drive to get to the shower, so I didn't have too much time to get photos this morning. So...I will stop complaining and just show you what I made.

I used a white CS base, and layered this greyish PP onto that. I cut another piece of that PP and flipped it to the other side. Which is slightly darker grey in color. I layered this pretty bride dress sticker from Pebbles onto that. I decided to use my black ink pad around the edges of the PP for a little distressing. It was a little darker then I wanted, but it did bring out the black flowers in the PP more. Which is what I was trying to do...lol. Next I cut a piece of white CS, and hand wrote the "Bride-to-be...", and attached that. Last, I wanted some bling. Because what fun would a wedding themed card be with out bling? So, I started with some little pearls I had, and added a couple to the "back" of the dress in the sticker. You can see I put 3 on there. I really liked the way it turned out. I also added a few i-Rock gems to the dress too. You can see a couple in this photo. I also used i-Rock gems on the sentiment strip, and on the "i" in Bride.

Well that is all this time for real...lol. Have a great day!

Shower Gift

Hi there...as you are reading this, I am off at a bridal shower for my husband's uncle's fiance. Say that ten times fast...lol. Anyway, I wanted to make them something special as a gift instead of the usual crockpot gift...ha ha. So today I am going to share with you what I made.


I started with one of the 7 Gypsies white trays. Next, I picked up a bunch of white patterned papers at my LSS. They all have some sort of pretty detail to them, and are all shiny. I also purchased some glitter alphabet letters, butterfly stickers (Martha Stewart collection), and a couple different rhinestone and pearls flourishes. OH yeah, and the little rhinestone trim that I used along the outside of the tray. I cut the papers to fit inside each "spot", and glued them down with scor-tape. Next I decorated each rectangle with the embellishments I bought. Like I said before, I used a rhinestone trim along the outside of the tray. This was sold "on a roll", so it was actually super easy to put on. I hope they like it! I also made them a set of thank you notes as part of the shower gift. I didn't get a photo of them, but they are just a simple white card with a "thank you" sentiment and some pretty ribbon I picked up at Hobby Lobby. Well that is all for now. I must seriously focus on the wedding gift now. I am making them an album, and I only have 12 pages done....AHHHHHHHH!!!! That is my major project for the coming weeks...ha ha. Thanks for stopping by.


This is for the following challenges:


Cupcake Craft Challenge - Top 150 - I picked #19 - Alter Something

Simon Says Challenge - Anything Goes

Wednesday, July 6, 2011

CHA Sneak Peeks are Starting!!!!!

I am getting so excited with all these CHA Sneak Peeks around Blog Land. I always look forward to this time of year...of course I think I NEED all of these new things, and I probably don't...lol. Anyway...check out the new


She posted them on her blog today. 5 AWESOME lines.


Be sure to hop around blog land and see some of the other new products coming out this month. Ohhhhh sooo exciting!!!

Sunday, June 19, 2011

Father's Day 2011 - Lots of photos

HAPPY FATHER'S DAY!!!!! Today I can finally share with you the projects we made for father's day gifts this year. I am soooo excited about how these turned out too. I hope they like them as much as my girls and I enjoyed making them. I have wanted to do this project for a long time now, but have been putting it off because of cost...until I stumbled upon this......at Target. Yes...a clock kit. This is a "kids" craft kit, but had everything in it we needed. I priced out clock mechanisms at the craft stores, and by the time I bought all the supplies it would cost a small fortune to do what I wanted to do. BUT...Target came through for me again...lol. These kits were originally $9.99, but I found them 1/2 off! So...I quick grabbed the 3 kits and needed and off we went. I also picked up some Modge-Podge, brushes, and number stickers. The kit comes with foam numbers, and I wanted something else. So it cost me around $25 for create 3 gifts instead of a small fortune...lol. So...to get started, the girls picked some PP from the DCWV Guy Stack. Then we traced the clock, and cut out the correct size circle. Next...we got into the fun fun Modge-Podge! The kids loved playing with this. Somehow going through these photos, I noticed I didn't get any of my middle DD Modge-Podging. I thought I took a couple...but can't seem to find them on the computer. But...here are some photos of the process. After applying the Modge Podge to the wood, we layered the paper onto that. Then we used various photos and put them on the clock. Each clock is different, as it features photos of the girls with either daddy, grandpa, or papa. I then used the sticker numbers to put the clock numbers on. Once all those were in place, we used more Modge-Podge! (Gotta love the Modge-Podge). This time we went over the photos and papers to seal them, and make them glossy. Notice the cup from lunch on the table...lol...we took a short break in between for a trip to Salsaritas...lol. Well here is the finished products! I just love them...and I am sure they guys will too!This one is Daddy'sThis one is Grandpa's


This one is Papa's


Well, what do you think? Super fun to make too. My numbers aren't "perfect", but that makes it even more fun. Have a great day!

Sunday, May 8, 2011

Mother's Day Gifts 2011

Wow... what a weekend! Yesterday we celebrated my DD's 1st Communion. It was a beautiful event and a beautiful day. She had a ear to ear smile the entire day too. The weather held off, and was perfect for an outdoor party too. Now it is Mother's day! Well, today I wanted to share with you the gift my girls are giving to their grandmas. I am all about the homemade gifts...so...we decided to make homemade birdbaths. I got the idea from my MOPS group. It really is a simple fun project. You need 2 terracotta pots, and 1 terracotta base. Plus, liquid nail, paints, and sealer. Here is the finished products.

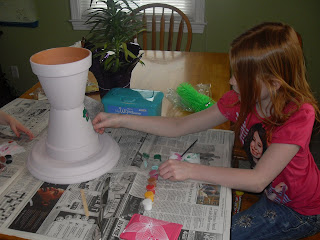
Aren't they so pretty????!!! I painted the base coat, and let the girls go to town with creating fingerprint flowers....well at least they were supposed to be making fingerprint flowers. As you can see...we got a few other "things" too...lol. Here are a couple "in-progress" shots... It is all about the process...lol. They did love painting them. Now we will see what the grandmas think. Although, because of the business of the past week and yesterday, I never got them sealed. My DH bought the sealer for me, but we didn't get a chance to do it. So I will be giving them their gifts and taking it right back....lol.
Well...I wish you of my fellow moms, aunts, grandmas, etc out there a very happy mother's day!

Tuesday, May 3, 2011

A little Coffee Gift

HI there. Sorry I have been a little MIA. Things have been a bit crazy with preparations for my DD's 1st Communion this coming weekend. I also experienced a case of the missing mojo last week...but I am back and coloring images and creating again. Yesterday I got 3 images colored, and ready to be made into cards! Well, today I wanted to share a quick little gift idea I made. Being teacher appreciation week, this is a fun idea to give to a teacher too. This project seriously took me like 3 minutes. So you could whip a whole bunch of these off in no time. Could also be used for shower favors, end of year gifts, or you can use them at Christmas time for office gifts...you get the idea...lol. Enough rambling...here is the project.
Sorry the photos are so fuzzy...the constant rain this past few days isn't giving me the sunlight I like for photos. Anyway...as you can see...super easy! I took a piece of mug PP, and wrapped it around the little bag of coffee. This coffee bag, I found in the Target $1 spot...they have them a couple times a year. I got this one a few months ago, and have been staring at it, and never did anything with it...lol. I used scor-tape to hold the PP on. Then I used the Smell the Coffee image from QKR Stampede. It is actually stamped onto the back of the mug PP. I trimmed it down, and rounded the corners. I added the little mug brad, and layered it onto the PP. That is it...super easy...I told you. You could also add a bow to the top, or other embellishments. I decided to just go simple for this one though. Well that is all...I am off to lunch duty at my girls' school, then hoping to get the other cards done tonight. Thanks for stopping by!

THis is for the following Challenge:
Cupcake Craft Challenge - Something with a C - Coffee starts with a C!

Sunday, April 24, 2011

First Communion Frame

Hi there. I hope you all had a wonderful and blessed Easter. We had a wonderful day with family. I wanted to share a project I made as a gift for my DD. In just a couple weeks, she will be making her first communion. Last week while she was off of school, I took her to have photos taken. My plan was to go and ONLY get the $9.99 package....well...yeah I totally got sucked in...lol. I tried to tell my hubby to come with me...but he didn't listen...and well I am just a sucker for beautiful photos. So...I already had this frame started, and now I have photos to put on it! I picked up this photo box from my LSS. I believe it is from 7 Gypsies. I also picked up the various PP's I used at my LSS. I am rather amazed at how difficult it is to find religious themed papers! I am currently searching for a religious/1st Communion themed scrapbook kit. If anyone knows of a place to get one at a reasonable price...feel free to leave it in the comments on this post. Anyway...here is what I made her, and some close-ups too.Ok...so this is the whole photo box. I just love the way it turned out. I simply cut the papers to fit the 4x6 boxes...then added various embellishments. (Which by the way are also hard to find religious embellishments.) I was able to find some stickers at AC Moore, and some little cross charms at my LSS. Now...here are some close ups of some of the boxes. For this box, I added some Prima flowers to the base of the photo. Then I added some platinum stickles to those. You can also see the top of one of the stickers I added. For this box, I used my Cricut to cut the date of the 1st Communion. Then I added some smooth pearls to the letters for shine. I also added some stickers and a little cross charm I picked up at my LSS. For this box, I used a big pearl and diamond/rhinestone flourish I picked up at AC Moore. It is one of those big sticker ones. I added the little cross charm, a cross sticker, and some Prima daisies. I think this is one of my favorite boxes...just so pretty. For this box...the cross is the main focal point. The cross is just the PP. I cut it to be the center of the box. Then I added some more of those little Prima rosebuds. I again used the platinum stickles, and added them to the cross and the flowers.
Well, that is all for now. She has already seen this, and it is already hanging on my wall. She just loves it...and so do I! Thanks for stopping by!

I am submitting this for the following Challenge:

Do You Stack Up? - Easter Blog Hop challenge. You must do the blog hop, and put the letters together to know the theme for this week. Plus the hop gets you in for lots of fun prizes!

Sunday, April 3, 2011

Sunday Scrappin

We had a pretty "slow" Sunday. My poor hubby is not feeling well at all. He has a fever, and all the other things that go with that. So, we spend the day at home...other then going to church. Well, I was feeling somewhat motivated today, so I FINALLY finished my 2010 album! I had 5 pages left that needed titles and journaling. So I got to work. Here are 2 of the pages that I liked best. This page is my oldest DD with my nephew around Christmas time. These 2 just love being together. Since they live out of town, we don't' see them often, but when we do...they are inseparable. I was so glad this photo of them hugging came out. The papers I used are CTMH, and the rub-ons are from Fancy Pants. This page is actually the last page in our 2010 album. The first page of the 2010 books was this same pose in front of the fire place. The idea was to see how much they grew over the year. The numbers on the top are chipboard from Maya Road that I sponge painted white. The PP is all CTMH. I used the white on the bottom for some journaling. Well now that this album is done I guess I need to get started on the Christmas 2010 album, and our vacation album from February. Then onto some 2011 fun. It just never ends...lol

Saturday, April 2, 2011

Saturday Crafting Fun!

Hi there! I just returned home from my LSS (Buffalo Stamps & Stuff). Today they had a kids craft class. So I took my older 2 girls. We only purchased 1 class kit, and all 3 of us worked together. It was a great time! I love crafting with my girls. Of course being me...I can't go anywhere without my camera...so I took a few pictures while we were there. You will also notice the stuff bear in the photos. My middle daughter brought home the class teddy bear for the weekend. It is our weekend to "host" him, so we brought him along. He sat on the table while we were crafting. In the journal that comes with the bear, they want you to include photos of what you did while "Edu" was visiting with you. So, I got a few shots at the stamp store craft time. Well here is a few of the photos I took.
This is the girls waiting to start. We got our class kit, and we are ready to go!Enjoying a little treat from Sharon, the store owner.Yum, Yum...these were good cookies!Here is our work in progress. As you can see from this photo, it was a punch out die-cut kit that we worked with. Here is a few of the wheels and the little wagon cars in progress.And our finished Bunny Wagon Basket! Isn't this just adorable???!!! It is already nicely placed in the center of our table at home, and filled with some yummy treats. They gave the kids some treats at the class to fill each little car and the baggie with the big bunny on it.
My girls proudly showing off their finished project. Thanks Buffalo Stamps and Stuff for a great class! What a fun way to spend our Saturday afternoon.

Friday, March 4, 2011

Reject...


SO I made this card for The Go-to-Sketches submission call, but...I didn't make it...so...I will share it with you! It is very simple, but I liked the way it turned out. I used a white CS base, and various pieces from the SEI Chocolat stack. I cut each piece, and "scattered" them on the base. Last, I added the sticker from SRM stickers. Well, that is all...I am off to my craftcave to attempt a few challenges from this week. Have a great weekend!

SEI Link Party!!!!!!

Sunday, February 27, 2011

A Saturday full of Crop...

Yeah so that title doesn't sound right...lol...but fun. Yesterday I spent almost 12 hours scrapbooking. I went determined to finish my 2010 album....but I didn't. I did however get 20 1/2 pages done! Not too bad! The 1/2 was a page I already had the LO done, I just needed to add the photos. My pages are nothing fancy, but at least the photos are on the page, and in the book. When I first got there, I started with Sept...and got all the way to the end of November. I just have 2 November pages left! Then December...which happens to be the most photos of the whole year...lol. I have since decided to do a separate album just of Christmas. So that should help with the too many pictures problem. Well, since I haven't blogged in a while (since we were actually on vacation last week), I decided to share a couple of the pages I made with you.
Sorry they are so small. I struggle to get good shots of 12x12 pages. I was able to use some of my CTMH papers yesterday, as well as various other embellishments and papers. I used some stickers that I have had for YEARS too. Now I need to focus on getting a couple cards done, and back to the album. I hope within the next few weeks to finish my 2010 album once and for all. Then I can start working on my Great Wolf Lodge album from our trip last week! I even found a cool scrapbook kit in the gift shop there!