


Well that is it! What did you think? Off to celebrate, and "Dance the night away!" Thanks for stopping by!
 Of course I had to use one of the new Rhubarb images...since they are just sooo cute! I colored Honey Bee Rhubarb using gel pens and markers. Then I trimmed it down a bit. I used some green PP from my stash, and some orange PP from Echo Park. I layered them onto a white CS base. I added some yellow ribbon between the two PPs. Then I used the sentiment from the Bee Sentiments set from SNSS. We have a couple birthday parties in August, so this guy will be used for one of those parties for sure!
  I started by stamping the Your Birthday image on some yellow CS. I trimmed it down, and layered a little off centered on the PP from Echo Park. Then I stamped the little Cupcake image 4 times and colored them all a little different. I fussy cut them out, and used a pop dot to mount them onto some little flowers.
  Last, I put a flower in each one of the corners of the card. I thought this would be a cute card for one of my DD's to use for an upcoming birthday party. We got 2 different invites for 2 different parties on the same day at 2 totally different places...AHHHHH...where is the Harry Potter time turner when you need it. LOL Anyway, thanks so much for stopping by. Have a fantastic day!
 This little girl image is from Biblical Impressions, and is called Picking Dandelions. Isn't she so sweet? As a mom of 3 little girls, this really reminded me of my girls. They always run to grab the "puffy" flowers and blow them off. I started by stamping the image onto the white CS, and again on the polka dotted PP. Then I paper pieced the dress and bonnet onto the main image. I colored the rest with markers. I cut into an oval, and cut another PP oval to layer that onto. I layered onto a piece of orange PP next, and then added the yellowish ribbon. For the "bow", I cut a piece of ribbon, and folded the ends under to give it a "loop". Then I added the flower and brad to the center of that. A sweet fall colored card! Thanks for stopping by!
 I started with a white CS base, and layered the piece of PP from the DCWV stack "Nana's Kids". I love the colors in this stack...so bright and fun. Next, I rounded all the corners of the papers used. I layered a light purple CS rectangle in the center of the PP. Then I layered the images on. First I used a circle piece of white CS, and stamped the Sunshine Day image onto that. I felt it needed a little color, so I used colored pencils to color the "dots" on the letters and the flowers. Next I stamped and colored this adorable little girl on a swing image called Swinging. I fussy cut her out, and cut a couple "extra" lines on her. I actually cut the line between the two feet, so I could mount the one leg higher then the other. I love giving a little dimension to my cards.
  I did the same thing with one of the ribbons from her dress. I layered the image under the circle so it looked like she was swinging from the sentiment circle.
 Well that is all for now. Thanks for stopping by!
 Yes, it is Rhubarb...again. I just love this little guy! Wait until you see the next one I have to share with you...I made it last night. Well, if you haven't met Rhubarb yet, he is the newest line of digis from Sweet 'n Sassy Stamps. Korin, the owner and super talented illustrator, has been releasing a new Rhubarb every day. This guy was released the other day, and is called Rhubarb's Punkins. I printed him out and colored with watercolor crayons. Next I layered onto the two different PP's (which are both from the same Target $1 spot collection). I also added some orange ribbon from my stash. The "happy fall" is from one of the clear stamps sets from SNSS. A CAS card, but just adorable with Rhubarb! Well thanks for stopping by. Have a great weekend.
I started with the Rose Blossom digi from the SNSS store. I colored with watercolor crayons and cut with my CM cutting system. I layered that onto a green CS oval, and then onto the yellow PP from my stash. For the sentiment, I used the Praying for You digi image from SNSS. I layered that the same way I did the flower. I added some green twill ribbon under that. Last, I added a few little green gems to the top corner.
Be sure to head on over to the Sweet 'n Sassy Digi Challenge blog for more inspiration, and to link up your own project.
I did have to use this card for my dear friend who lost her mother. Her mother fought a tough battle with ALS...also known as Lou Gehrig's disease. She left a wonderful legacy behind her for sure. ALS, like many other horrible disease, has no cure. But, much research is being done to find a cure. Actually I will be participating in the local walk with my friend's family to help raise money to fight ALS. I am looking forward to being a part of this walk, and helping to support this family as they walk in honor of their mother.
 This is the 2nd one of these I have done. I really like they way the turn out. This time I decided to make a horse themed one for my middle DD. She just loves horses. I used this Mare and Foal image from QKR Stampede as my main image.
 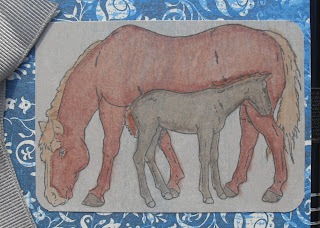 I stamped it onto the greyish PP and colored with colored pencils and Gamsol. Next, I trimmed it down, and rounded the corners. Then I added it to the altered notebook. Here it is.
  I went with blue to look like denim. The PP is all from Stampin' Up. I cut it to fit the journal and attached with scor-tape. I used the same grey PP on the binding as I stamped the horse onto. The giant bow and ribbon is actually "recycled". My mother got a gift once, and this bow was attached. She knows me too well, and saved them...lol. It was perfect for this journal. Last, I used me Cricut to cut the letters for "Notes".
 Well that is all for today. Thanks so much for stopping by. I am off to clean my house for book club today. I hope I don't melt in the process...lol.
 Karen is one of our fabulous DT ladies...isn't her china pretty? Now...I will admit...I really like this china, but trying to find something in my stash that could be made using this as the inspiration was really a tough one for me. A lot of my stash is "cutsie" stuff, and this does not fall in that category...lol. So after staring at this picture for a while, I noticed the beautiful bow and holly at the very top of the plate....so I went from there. Here is what I came up with.
  I found this holly and berries paper in my stash, and cut that as my base paper. Then I used the 3-D/Pattern Poinsettia stamp from Eureka Stamps to create this 3-D holly leaf.
  I added some green distressed stickles along the leaves. I have had these in my craftroom for awhile, but never use them. I also added some red stickles to the berries. Next, I wanted to recreate the ribbon from the china, so I grabbed some ribbon that i have never touched, but HAD to have...lol, and played with it to create a big bow. Last, I used my scalloped oval punch, punched a piece of cream CS, and added a rub-on sentiment.
  Isn't he cute???!?!!! I really like this guy. He is a fun image to play with. He has a look that could go vintage, or not too. I stamped him off on cream CS, and added a little bit of color using colored pencils and Gamsol. Then I layered onto the center of the red snowflake PP. I added the green PP pieces to the sides. All the PP are from CTMH. I layered all this onto a cream CS base. Next I needed a sentiment, and some sort of embellishment. Well the flower I had was a white/cream color to start. I really wanted red, so I decided to make my own "glimmer mist". I added a couple drops of red re-inker and a couple drops of white liquid pearl to a mini mister bottle. I filled it was water, and shook. I then lightly misted the flower. I loved the way it turned out so much, that I decided to spray the CS banner I cut for the sentiment too.
  You can see it a little better here. Hard to see the sparkle, but I promise it is there...lol. It just gave the flower and paper a slightly different look. Well that is all for now. Thanks for stopping by, and have a fabulous hot sticky day...lol.
 This card is for the following challenges:
Cupcake Craft Challenge - Wish Upon a Star - Snowman is holding stars!
What if? Wednesday - Sketch Challenge
 ...and the Pansy 3-D/pattern stamp from Eureka Stamps.
  So cool huh??!!! I just love these 3-D stamps from Eureka stamps. They are really very easy to use, and add so much to a project. Ok...first I need to tell you about my photo above. We have a garden in front of our bay window. Each year, I plant impatients in there, and we have bulbs in the early spring. Well this year, I switched up my flower of choice for the garden. No impatients. I bought some other things...BUT...right in the front row under the peach tree, popped up this little plant. A pansy plant! I was soooo excited since I love pansies, but I was very confused where it came from...lol. I never planted these in that spot. We now call it the "random pansies". Funny thing...there is another "random pansy" plant on the side of the house growing in a rock bed! Well, I used my "random pansies" as my inspiration to make these 3-D pansies. I started by stamping the image onto white CS with purple ink. Next, I colored all the pieces with colored pencils. I used a purple pencil to go over the "dark part" of the pansy. Next, I cut out all the pieces, and began scoring and curling as the directions say to. When you make your own 3-D pansy, I recommend that you lay out the pieces exactly as the picture shows. It is easier to grab the correct number petal as the directions call for them. I also find with any of the 3-D images, they "curl" better if you use one squirt of a mini-mister bottle on it before playing with it. Well, after I got these guys together, I attached them to a simple green CS base, and added a rub-on. I really wanted to make the flowers the focal point of this card, so I didn't use any PP or other embellishments. I am going to play with this stamp again and see what other pansy creations I can come up with. If you haven't had a chance to check out the 3-D/Pattern images from Eureka Stamps yet, be sure to do it today! There are so many to choose from, and they add so much to your projects!
  Isn't it soooo cute!!!!!! I just love these new images. I printed out 4 of them, and trimmed them down. I layered them onto some PP from SEI, and added some ribbon from my stash. I colored just Rhubarb's scarf, and added some glitter to his belly. I also added some white liquid applique to the "snow" around his feet, and the snowbear's base.
  Last, I stamped the sentiment, which is from the one of the clear sets from SNSS.
  I used a white CS base, and layered this greyish PP onto that. I cut another piece of that PP and flipped it to the other side. Which is slightly darker grey in color. I layered this pretty bride dress sticker from Pebbles onto that. I decided to use my black ink pad around the edges of the PP for a little distressing. It was a little darker then I wanted, but it did bring out the black flowers in the PP more. Which is what I was trying to do...lol. Next I cut a piece of white CS, and hand wrote the "Bride-to-be...", and attached that. Last, I wanted some bling. Because what fun would a wedding themed card be with out bling? So, I started with some little pearls I had, and added a couple to the "back" of the dress in the sticker.
  You can see I put 3 on there. I really liked the way it turned out. I also added a few i-Rock gems to the dress too. You can see a couple in this photo. I also used i-Rock gems on the sentiment strip, and on the "i" in Bride.
 Isn't he adorable!!!!! Here is the best part...everyday from now until July 19th, a new Rhubarb digi will be introduced. So be sure the check the site daily to see which Rhubarb is next. I used the Rhubarb the Teddy Bear image for my creation today. Oh, and in all my excitement over Rhubarb, I forgot to tell you what the challenge is...Bling...add bling to you project using a SNSS digi image. Well here is a close up of some of my bling.
 Any idea what it is/was before it ended up on this LO page?
 You can see from the photo, I used 4 of these metal blingy daisies. I am going to give you a minute to try to figure out what it is...I will post the answer at the end of the post. For now...lets talk about this page. When I first saw Rhubarb, I thought he would be perfect for this LO page I needed to make for my 2011 scrapbook. My middle DD had to bring home the Kindergarten class teddy bear for a weekend back in April. Well...I thought it would be fun to use this digi on the page for our EDU Visit. My bling is the glittery title letters, as well as the metal daisies. I colored Rhubarb with watercolor crayons, and fussy cut him. I layered him onto the PP from DCWV. Then I added my photos, and journaling.
  I am going to a baby shower in August, and needed a card for that. I thought this guy was perfect. Can you tell it is going to be a boy...lol. I colored him with colored pencils and gamsol, and trimmed with my CM cutting system. Next I layered with the PP from SEI. There is actually a rub-on sentiment, but it is hard to see due to the super bright sun when I took the photo...lol. I also wanted to make him "cuddly", so I added some blue fun flock to his belly and feet.
  Well, that is all for now. Thanks for stopping by.
 As you can see, the PP is all the same (from SEI), but the way I used the image is slightly different. For the first card, I just stamped him off with black ink and added a little bit of color using markers. I also added some stickles to the star, ornaments, and buttons. For the second card, I stamped the image with Versamark onto the green PP. Then I embossed with sparkly white embossing powder. I was going for a different type of look with this one, and very simple. I did add some stickles to this one too. Last, I added the sentiments to each of them. It is one of the 4 holiday sentiments that come in the Deck the Halls stamp set. All 4 sentiments are holiday/Christmas, but in different fonts and sizes. I like the diversity of that set. Well that is all from me. I will merrily send you off to your next stop along this hop which is....
If at any point you get "lost", head on over to the QKR Stampede BLog for a complete hop order. Also, see any images along the way you love???!!! Well what are you waiting for? Head on over to the QKR Stampede Store. There are 100's of awesome stamps to choose from.

 This first set if for my oldest DD. She is headed off for 2 weeks of ropes courses, zip lines, rock wall climbing, and more extreme sports. For her cards, I used the Cowboy Owl stamp from QKR Stampede. Yes, I did NOT color the images. I did that on purpose...lol. I thought it would be fun for her to personalize each card before she sends them. They are very simple, but cute. I hand wrote the "Howdy from camp!" on each one with a gel pen.
 Guess what kind of camp she is going to? Yup...horse lovers week. Since the kids are all younger, they are mostly spending the week teaching the kids about horses, and how to care for them. They are supposed to go for a ride at least one of the days too. She is just ecstatic about the whole thing. Like the other set, I left the image uncolored so she could color them herself. She did tell me yesterday that she will color them all like her favorite horse at camp. The image is called Mare and Foal also from QKR Stampede. I hand wrote the sentiment on these also. I can't wait to get one of each of these cards in the mail!!!!


 Pretty neat huh? All the PPs are from Echo Park. The sentiments are either rub-ons, or stamps from QKR Stampede (our sister company). I really enjoyed playing with these images to get 6 totally different cards. All of the trees were stamped with Versamark, and embossed with either silver or bronze embossing powder. Then I trimmed them down to a rectangle. All the tree pieces of CS are the same size on each card. Then I just went to town playing with the PP to get different looks. Well, what do you think? It is kinda nice that I have been able to get a jump start on my Christmas cards for this year. I think I have close to 25 done already!
 Well that is all for me for now. Thanks for stopping by!


