Hi there, and welcome to the Christmas in July Biblical Impressions Blog Hop! The official start time for this hop is 8am EST July 1st. So, if you arrived early, hang in there until we make sure all links are up and running.
If you arrived here from the Main Biblical Impressions (QKR Stampede) blog, then you are on the right track. If at any point during the hop you get "lost", please head back there for a complete hop order. Well...onto business...here is my Christmas creations... I figured this was a great time to get started on my Christmas cards for this year. So...I made 5 of the same style card using the Jesus Savior word tree stamp. Ok, and I will admit...the entire time I was making these cards I kept singing "Wonderful...COunseler...Almighty GOD...", you get the point...lol. These cards are very simple, but turned out very pretty. The troubles I had in the past with Christmas cards, is I made the "plan" for them too complicated...so I wanted to go simple, so I can get them done on time. Here is a close up of each of the 3 different cards.
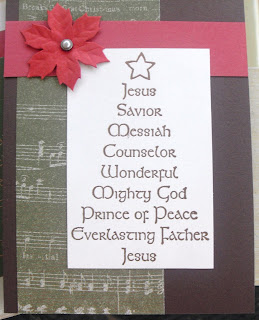

 As you can see, I used the same PP for each (from CTMH), just the other side for some of them. Then I added the red CS piece. The image was then stamped with Versamark, and embossed with either gold or copper powder. After layering those onto the card base, I added either a little charm brad, or a flower brad.
Well, I must send you off to your next stop on the hop...
MONIKA
...check out her gorgeous creation!
Thanks for hopping along!
I figured this was a great time to get started on my Christmas cards for this year. So...I made 5 of the same style card using the Jesus Savior word tree stamp. Ok, and I will admit...the entire time I was making these cards I kept singing "Wonderful...COunseler...Almighty GOD...", you get the point...lol. These cards are very simple, but turned out very pretty. The troubles I had in the past with Christmas cards, is I made the "plan" for them too complicated...so I wanted to go simple, so I can get them done on time. Here is a close up of each of the 3 different cards. 

 As you can see, I used the same PP for each (from CTMH), just the other side for some of them. Then I added the red CS piece. The image was then stamped with Versamark, and embossed with either gold or copper powder. After layering those onto the card base, I added either a little charm brad, or a flower brad.
Well, I must send you off to your next stop on the hop...
MONIKA
...check out her gorgeous creation!
Thanks for hopping along!

 Kinda hard to see the images in the photo with the page being 12x12, so here is a close up.
  I started by coloring the words with metallic gel pens, then fussy cut them. Next I colored the little girl with gel pens and markers. I fussy cut her out too. I ran all the images through the Xyron to get them nice and sticky. I attached them to the page. A very simple LO, but I thought it turned out cute. Now I just need to wait until Monday to get a picture of my girls for this page! That is all for now, thanks for stopping by!
 Let me just say...these stamps are actually really easy to work with, but as you can see, the finished product just looks great! It is like when you make that super simple recipe that you can serve to guests, and they think it is gourmet food...lol. I started by stamping the main flower onto some light peach CS. I picked a slightly darker CS for the center 2 pieces. I then fussy cut along the solid lines as per the directions. I decided to add some ink distressing to the main flower petals. Then I got to work creasing and folding, and gluing. A trick I found when using these 3-D stamps, is to have a mini mister bottle handy. I find the CS easier to manipulate when it is just slightly damp. The leaf is from the Fern Leaf 3-D stamp. I stamped those off 3 times, and scored, misted, and creased as per directions. Here is a close up so you can see the "POP" these images give your card.
  Then I layered the flower and leaves onto the oval CS. The PP is Cosmo Cricket (which is where i pulled my colors for the flower from). Last I added the rub-on sentiment.
  Here is what I did with...
 I thought this guy would be just perfect for a running card. Especially for this program...where it was all about finishing..not winning. So I used this adorable
 I started by gobbing the clipboard "6" with glue. Then I added the pink glitter, which I bought 2 summers ago at a stamp convention...the container is still full...lol. Then I gathered a group of pink CS and PP. I layered the dark pink CS onto the circle card base. I cut a piece of the pink polka dotted PP and placed it down the middle. I used a punch to make the girly frilly boarder under the PP. I added the pink ribbon, and then layered the glittery 6 onto that. I used a gel pen to write the sentiment. Last, I added the glimmery pink gems which were laying around in my craftroom for about a year.
 Neat huh? And this was honestly super easy! I stamped the leaf onto some green CS using green ink. I fussy cut the image, and scored along the dotted lines. Then I folded the scored lines. I wanted to add a little more, so I ink distressed the leaf too.
  These ferns reminded me of a jungle, so I headed to my LCS and picked up some animal stickers. I used some PP from Tim Holtz, and put the lion sticker onto that. Then I added the fern leaf in front of him. Last I added some brown ribbon, and a button with fibers in it. Really this was very simple, and looks very cool! Be sure to check out the rest of the
  ...at Target. Yes...a clock kit. This is a "kids" craft kit, but had everything in it we needed. I priced out clock mechanisms at the craft stores, and by the time I bought all the supplies it would cost a small fortune to do what I wanted to do. BUT...Target came through for me again...lol. These kits were originally $9.99, but I found them 1/2 off! So...I quick grabbed the 3 kits and needed and off we went. I also picked up some Modge-Podge, brushes, and number stickers. The kit comes with foam numbers, and I wanted something else. So it cost me around $25 for create 3 gifts instead of a small fortune...lol. So...to get started, the girls picked some PP from the DCWV Guy Stack. Then we traced the clock, and cut out the correct size circle.
  Next...we got into the fun fun Modge-Podge! The kids loved playing with this. Somehow going through these photos, I noticed I didn't get any of my middle DD Modge-Podging. I thought I took a couple...but can't seem to find them on the computer. But...here are some photos of the process.
  After applying the Modge Podge to the wood, we layered the paper onto that.
  Then we used various photos and put them on the clock. Each clock is different, as it features photos of the girls with either daddy, grandpa, or papa. I then used the sticker numbers to put the clock numbers on. Once all those were in place, we used more Modge-Podge! (Gotta love the Modge-Podge). This time we went over the photos and papers to seal them, and make them glossy.
  Notice the cup from lunch on the table...lol...we took a short break in between for a trip to Salsaritas...lol. Well here is the finished products! I just love them...and I am sure they guys will too!
 This one is Daddy's
 This one is Grandpa's


 See..super cute!!!! I colored with water color crayons, and cut the image using my CM cutting system. Then I ink distressed the edges...and while I was at it...I ink distressed the PP and base too. Speaking of PP...it is from Echo Park's new Splash collection. The sticker "sun" is from my Great Wolf Lodge scrapbooking kit, I had it left over, and thought it went well with this. I wanted to make the shells look a little more "shell like", so I used some crystal effects on them for a shimmer effect.
  As you can see...it did the job. Well that is all from me for now. Head on over to the Sweet 'n
  I decided to go a different route this time around. Instead of a card, I used the cool
  The I grabbed some tape and toothpicks, and went to town...lol.
 I folded the little tab I left over the toothpick and taped it down. A little "trick"...the tape needs to fold over the front of the image too. Otherwise, the image will slip off the toothpick too easily.
  Here is what it looks like done. My girls couldn't wait to help get these little flags into the cupcakes. I bought the cupcakes yesterday, and they have been eyeing them up ever since. BUT they had to wait until after mommy used them for her blog post...lol. So I let them help me get the photos ready.
  Here they are helping me put the flag picks into the cupcakes.

 Isn't she cute? This image is one of the images from the
  Sorry the photo is kinda blurry. I was going to make a card for this hop, and at the last minute last night, I changed my mind...lol. I came up with the scrapbook LO instead. I wanted a page to use in our 2011 scrapbook album, so I thought this would look perfect for our 4th of July page. I was at my LSS the other day, and picked up this new paper from BoBunny. There is another page to make a 2 page LO, but I didn't get that one done yet. I started by cutting the scalloped circle paper in half, and adhered it to the top of the page. I thought it looked like those semi-circle banner flags you see hanging for 4th of July decorations. I used my Cricut to cut the "USA" boarder, and added that to the page. I cut a piece of blue CS for a photo mat, and also cut the 4th of July with my Cricut. Then I added the adorable Liberty Balloon image and her firecracker balloons.
  I stamped her and colored with watercolor crayons. Then I fussy cut her out. For the balloons, I used glitter gel pens, and fussy cut them. I then used some red ribbon as the "strings" of the balloons. I cut each piece of ribbon a different length. I ran them all through my Xyron, and adhered them to the bottom left corner of the page. LOVE IT!!!! Last, I added some stickles to the USA, and 4th of July die cuts. Now, I just can't wait to get an adorable photo of my girls for this LO.
  Well, it was like Christmas in my house getting this box. My girls dove right in checking out all the headbands, clips, and ribbons. I wanted to share some photos of my girls showing off their
 This is Gimme Braid Ribbons. The ribbons are nice and long, so good for any length hair. I love the look of ribbon braided into hair...and this makes it sooo easy and fun to do. This one is from the brand new line that is available beginning June 15th at Walgreens Nationwide. Here is some photos of our first time using these...
 We started with a ponytail.
  Next, we used one of the clips to hold the ribbon in place. There is a "loop" at the end of the ribbon to slide the clip through, and then slip into the hair like a bobby pin.
  Then I simply braided the hair, putting the ribbon with one of the sections of hair.
  Like I said...the ribbons are nice an long...so I needed a "creative" way to use up the rest when we got to the end of the hair. So, I used it to wrap around the holder at the end. I used another clip to hold it in place. My DD went to dance class like this, and it held PERFECT. Super easy, and super cute!
  This one comes with 2 pony holders, and 4 Bobbies.
  I started by brushing all the hair to one side. Then I braided it, and used the red flower pony to hold the braid.
  We wanted to add a little more "fun" to the style, so we also used
 Isn't that flower just stunning???!!! I have a wedding to go to in July, and think this is what I want to use for my hair that day. The black just goes with anything, and is so elegant. There are a whole bunch of gorgeous clips in this line too.