If you have never seen this adorable mouse you really need to check him out. He is available in both CLEAR stamps and DIGIS. You can find a Cocoa image from just about any occasion, and he is just soooo stinkin' cute! So if you are like me and "Crazy 4 Cocoa", then you need to join us for this brand new challenge blog. I was so thrilled when Korin asked me to be a part of this wonderful new challenge blog. Since I am CRAZY...I mean since I am Crazy 4 Cocoa! The fun starts today...that is right...join us Cocoa Crazies right HERE on the Crazy 4 Cocoa Challenge blog. Each Tuesday we will bring you a new challenge...and your only requirement to play...to use one of the many adorable Cocoa images available in the Sweet 'n Sassy online store! And today to help you get started with your love for the adorable Cocoa...if you play along with us this week, you will get a wonderful free digi Cocoa! So for our first challenge we are asking you to make a card using a Cocoa image for someone you love. Well here is what I came up with. I made this adorable Cupcake Cocoa card for my oldest DD's 8th birthday.
  Cupcake Cocoa is available in both Digi and Clear stamps. I used the clear stamp and stamped him onto white CS. I did some paper piecing, and colored with colored pencils and Gamsol. The sentiment I used is from another Cocoa clear stamp set called A Cocoa Kind of Birthday. For the LO of this card, I used the Sketch from our sister challenge blog The Sweet Stop!
 Alright your turn!!! How can you NOT be Crazy 4 Cocoa????!!!! He is just soooo cute! So play along with us at our first ever Crazy 4 Cocoa Challenge, and be sure to link up your creation! Don't forget, anyone who plays along gets a free Cocoa Digi!!!!!
 Starting tomorrow and every Tuesday, you will find a brand new
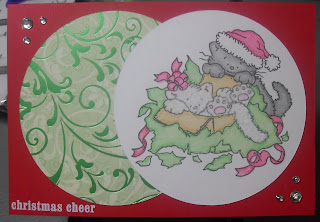
 I was very pleased with how this came out, and I am sure it will look even better with photos of my family on there! I started with a brown piece of PP from TAC. I then used some PP from the Olivia collection from CTMH. I layered the white photo mats onto the PP circles. Then I used my Cricut to cut out the letters. (It will be so much easier once I have my Xyron to get these letters on =)...my mommy is getting me a Xyron for Christmas!) Next I added 2 of the
  These are both ones I stamped off before when I used the baby wipe technique. I trimmed them down, and added them to the corners. I just love this image. It is so pretty. A lot of the other DT ladies have used this image too. You can scroll through the
  I used PP from My Mind's Eye. The center sentiment is from that same paper pack. I also punched out some little snowflakes, and added those. I wanted to embellish it up a little, so I used some i-Rock pearl, and some snowflake eyelets.
  I also used some pearl smooth on the "Christmas" to make it shine.
 So I sta
 Next I added some
  Not too bad right? I plan on heading downstairs today to get some more done. I guess I was all about starting and not finishing things this weekend. I also made these...
 These are for teacher gifts this year. Oh, and I wrapped ribbon around the containers these are going on too.
 So these are supposed to be golf balls. My DD is going to have a mini-golf party. I cut the circle cards with my Cricut. Then I ran the front through the cuttlebug, but use the embossing folder "upside down". That way there would be indents and not bumps. They are very simple.
  I thought it turned out pretty well. I stamped the little
  A couple years ago I purchased (well my mom purchased for me) a binding system. It is not a fancy one, but it does the job, and I like it! Anyway, I started with 2 pieces of white CS, and layered some SEI PP onto those. For the middle, I used some pieces of loose leaf paper the I trimmed up.
  On the front I used some scraps of white CS and hand wrote the sentiments on it. I then used the
  Sorry the photos are NOT the greatest today. The weather is yucky here, so I can't get the right lighting. It is way to windy and rainy outside to try to take them out there. Well, I made 30 of these total. As you can see, there are 3 different colors for these cards. Here are close ups of each one.

 I ran each CS base through the Cuttlebug, then attached the folded flowers. I then used the
 So this "panoramic" view thingy is my new favorite technique. The key is to remember to take the right photo views when you take the pictures. I learned this technique back in May at the CKC convention. There is a company that actually sells papers to help line up your photos and everything. BUT, I didn't have those, so this is what I got.
  They aren't perfect, but I thought they still looked pretty cool. This one is actually 2 different photos. I made one the other day that was a combination of 3 photos. I just think it gives the coolest effect on a page when you do this. The "secret" is to make sure you take the photo combination you need from the same exact spot. When I took mine, I stood in one spot and just slightly turned my body to take the 2nd photo. DON'T move your feet!
  As you can see, I used iron on transfer paper, and printed the words. After ironing on the words, I added batting to each one, and sewed it over the hanger. Then comes the fun part! The kids get to create a turkey on the banner. I had my DD do her banner ahead as an example.
  Isn't it adorable!!!! I am very pleased with the finished product.

 Here is my version of the sketch...
 I used the Splash Dance collection for this page. I started with a 12x12 piece of PP. I then choose 2 solid colors from the PP to use. I went with a peachy orange and a light green. I used a piece from another one of the PP in the Splash Dance collection for under my photos. I just love this collection...they little fishies are so cute! I trimmed my photos and layered them across the page. I used the reverse side of the PP I used for under the photos to cut out my title. The photos on this page are from my DDs' end of summer swim lesson party. Last, I added some embellishments...here is where my favorite Imaginisce tools come in!I used the i-Rock and the Glam Rock Pearls to create these "splashes". I used the swirl stencil to help me do these too.
  I used my i-Top to create some "bubble brads". I took some parts of the PP and added these...
 I just love this guy. He is so cute. I started by stamping him with Close to Cocoa ink, and coloring him with watercolor crayons. Next, I layered him onto the PP, which is from SEI. I layered the PPs onto a white CS base, and added the little brown "pearls". I also added some white fun flock to Mr. Moose's hat.
  I made this little mug card. I decided to make it "BLUE" and I used some "OLD" PP, and the template I used is "OLD" too. I traced the mug template onto the light blue CS. After cutting it out, you glue down the bottom and the side of the mug. This creates a pocket at the top to slide in a hot cocoa packet, coffee single, or as I did...a tea bag.
  After you have glued down the pocket sides, you can decorate to your liking. I went with this adorable Cocoa Mouse image from Sweet 'n Sassy Stamps. I stamped it onto white CS, then paper pieced the blue polka dot paper onto that. I added some stickles to the mug too. For the sentinment, I stamped it onto white CS and punched it out with an oval punch. I punched a scallop oval with the same PP I used on the mug. I attached a piece of blue ribbon, and put the sentiment on top of that with foam tape. I decided to make a little "pull tab" for my tea bag. I wanted to make it look like the little tag that hangs from a tea bag. I punched 2 squares from the PP, and stamped the sentiment onto them. I attached them together, but placed the end of the ribbon in first. Next, I attached some ribbon adhesive to the tea bag packet, and glued my ribbon onto it.
  I stamped the Daisy image (from Sweet 'n Sassy) onto white CS. I colored the centers yellow, and the stems green. I added some pearl smooch to the petals to give them some shimmer.
 I was attempting to set this for November, but well I accidentally added the 31...lol. You get the idea though...lol. The large piece in the upper left is a spot to attach a photo. I left it blank, so my MIL could add a photo of her choice. All the papers I used to cover the chipboard are from TAC, and were in my stash. I liked the bright colors for this. I stamped the sentiment on the top right piece, and added a layered flower. I hand wrote all the numbers and month names. Here are the extra months and numbers.

 I started with the